Circular (ring) buffer plus neat virtual memory mapping trick Circular (ring) buffer plus neat virtual memory mapping trick
  • Home
  • Posts
  • Home
  • Posts

Cocoa

Circular (ring) buffer plus neat virtual memory mapping trick

I’ve just updated my C circular buffer implementation, adopting the trick originally proposed by Philip Howard and adapted to Darwin by Kurt Revis: A virtual copy of the buffer is inserted directly after the end of the buffer, so that you can write past the end of the buffer, but have your writes automatically wrapped around to the start — no need to manually implement buffer wrapping logic.

This dramatically simplifies the use of a circular buffer — you can use chunks of the buffer without any need to worry about where the wrap point is.

See the new implementation, which is thread-safe with one consumer and one producer, with no need for locks, making it perfect for use with high-priority Core Audio threads, on GitHub: TPCircularBuffer.

There’s a basic example of its use over on the original post.

Read More

Experiences with some app promotion strategies

Buy my thingIn the dim and distant past, while in a moment of neglecting my PhD to work on the very first version of Loopy (which is now currently one of the most popular music apps on the iPad!), I had grand visions of an almost totally passive income, making apps. I love the creative initial product development process and, with naive optimism, I pictured pumping apps out and then sitting back and watching the money roll on in. Tim Ferriss’s 4-Hour Workweek had me enthusiastically lifestyle-designing and dreaming of all my free moneys.

I bet I’m not the only one, but of course reality struck and we realised that the App Store aint that kind of beast. Like any other product, an app needs to be actively presented to the world on a regular basis, and needs to be nurtured to keep it fresh and relevant.

I say “we” because at this point, my partner Katherine joined me after this particular revelation, and became A Tasty Pixel’s part-time marketing director and PR strategist — it’s taken two of us to keep A Tasty Pixel’s wheels turning smoothly, and we still have a lot to learn.

I thought I’d take a moment to reflect on some of the lessons we’ve learned in the past year, in which we’ve released a relatively successful travel planning and travel assistant app, The Cartographer, a very successful live looping app, Loopy, and its big brother Loopy HD, and tried a bunch of promotion strategies, some successful, some not, and some that haven’t yet run their course.

Read More

Automatically Track App Sale Referrals

I recently came across an article on Mobile Orchard about connecting click-throughs to app sales, which is a rather ingenious idea using the affiliate program LinkShare to create trackable links. As Apple record and report orders that come via these referral links, you can actually see the number of sales (not just views of the App Store page) that resulted from follows of the link. Plus you get a 5% cut of the sale!

I’m doing some experiments with advertising my live looper app Loopy lately, and want a way to track the success of various approaches. It occurred to me that the totally freeform nature of the LinkShare “signature” field (which you can use to track traffic sources) lends itself to an even more flexible approach than that presented in the Mobile Orchard article.

Here’s a way to use that signature field to report the domain name of any referrer who links either to the app page, or to a download link (like, say, http://loopyapp.com/download).

This way, if, say, TUAW link to your app site, if someone clicks through then clicks the download link on your app site and buys, the resulting order will be reported as coming from TUAW. If someone clicks through from your Facebook page, it’ll come up as coming from Facebook. You can even modify the script further to report more precise details (like the path), if you like.

It assumes you’re using PHP, but the principle’s the same for any other language (BYO code, though ;-)).

Step 1: Sign up to LinkShare

First, if you haven’t already, Sign up to the LinkShare program — Once you’ve created a LinkShare account, join the Apple affiliate program via the “Programs” tab. After 3 days, you’ll get an email welcoming you to the program, and you’ll be good to go.

Step 2: Create a product link

Once you’re admitted to the program, open up the “My Advertisers” sub-tab from the LinkShare Programs tab, and open the “Link Maker Tool”. This lets you search for products, and create a link that will open up your app’s App Store page, and will be associated with your LinkShare account.

Screen Shot 2011 09 13 at 13 17 31

Step 3: Create a download redirection script

Now we’re going to set up a script on your app site which will redirect the visitor to the URL you just created (which in turn, redirects straight to the App Store page). It’ll add a “signature” parameter to the URL, which corresponds to the original referrer, so you can track where orders came from.

Create a file called ‘download.php’ in the root of your app site, with the following content, with your LinkShare URL inserted where indicated:


This script looks for the original referrer in a session variable (which we’ll set up in the next step), so that the domain of the site that links to your app site is used, not just your app site’s domain. Then it creates a properly-formatted signature parameter (just alphanumeric), appends it to your LinkShare URL, and sends the viewer onwards.

Bonus points: I prefer to get rid of the ‘php’ extension to make the URL a bit cleaner. Pop the following into your .htaccess file to access ‘download.php’ as just ‘download’:

<IfModule mod_rewrite.c>
RewriteEngine On
RewriteBase /
RewriteCond %{REQUEST_FILENAME} !-f
RewriteCond %{REQUEST_FILENAME}.php -f
RewriteRule . %{REQUEST_FILENAME}.php [L]
</IfModule>

Step 4: Remember the referrer

Now, on the landing page script for your app site (or the site header), pop this in at the very start:


This stores the original referrer URL in a session variable, to use when we actually link the viewer through to the App Store.

Step 5: Test it

To make sure everything’s working properly, open download.php again, and replace “header” at the bottom with “echo”, so that instead of redirecting the browser, we just print out the URL where we would be redirecting to.

Open your appsite/download URL, and make sure the URL ends with “&u1=appsite“. That’s for direct visitors. Now, click through to your app site from another site, then click your “download” link. You should now see the name of the original site you linked from as the “u1” parameter at the end of the URL.

Once you’re satisfied that you’re good to go, make sure you replace “echo” with “header” again.

Step 6: Track

Now that you’re ready to track referrals, you can give out your http://yourappsite/download URL as your app’s direct iTunes download link (to reviewers, in your press releases, etc).

You can view a report showing clicks and orders associated with each referrer on the LinkShare page — create an advanced report by clicking the “Advanced Reports” sub-tab, then select your desired date range (I use “Since Last Payment”, and under “Report Type”, select “Signature Activity”. Hit “View Report”, and you’ll see your clicks and sales versus each referrer (“Member ID”, on the report).

Voila! Omnipotence achieved.

Addendum: This technique works for tracking referrers, but if you’re wanting to track the performance of ads (say, with AdMob), you’ll want to use your original LinkShare URL, with a custom “&u1” signature parameter. As ad platforms like AdMob link directly (and don’t, as far as I know, send a referer parameter), this script won’t pick up that it’s from your ad platform.

Addendum 2: LinkShare’s reports don’t distinguish between products, so if you’ve multiple apps, you might want to add a prefix to your signature parameter to tell ’em apart. You could, say, replace that header("Location: ".$linkshare_url."&amp;u1=".$signature); line with something like header("Location: ".$linkshare_url."&amp;u1=myapp".$signature);.

Read More

Experiments with precise timing in iOS

iOS is by no means a realtime operating system, but I’m aware that NSTimer and NSObject’s performSelector:withObject:afterDelay: mechanism aren’t particularly accurate, and I was curious to see whether I could do better.

Hands up, backing away

Disclaimer: I am not at all an expert in realtime programming, or Mach, or iOS-device optimisation, so this is pretty much a fumble in the dark. I won’t be at all offended if anyone wishes to shoot me down and offer a more sensible solution — in fact, please do! Until then, watch as I stumble on…

Also note that there are often ways to eliminate the need for precise timing of this nature, by architecting code appropriately — when it comes to audio, for example, CoreAudio provides a very accurate time base in render callbacks. For things like metronomes or audio synthesizers, it’s always better to establish a starting time, and use the difference between the current time and the starting time in order to determine state, rather than using a timer to advance the state. Still, sometimes, you just need a timer…

What the blazes?

So, I’m working on an update to Loopy, which uses a shared clock object to synchronise tracks and a variety of events (like user interface updates or timed track manipulations). A tester noted that the mute/unmute quantisation feature that I’ve recently implemented, which will mute or unmute a loop at its starting point (rather than whenever you tap it), tends to overshoot a little, resulting in a small part of the beginning of the loop being audible.

Of course, there are other solutions to this particular problem (like stopping or starting playback from the audio render callback, and using Core Audio’s timestamps for exact timing), but I use timers in other places outside Core Audio’s domain, which makes Core Audio’s timing mechanism unavailable, and I wanted to see how accurate I could get the timing.

Our friend, mach_wait_until

I read in several places mention of the Mach API utility mach_wait_until (from mach/mach_time.h), which is very low-level and supposedly fairly accurate. So, based on that lead, I put together an Objective-C singleton class that launches a high-priority thread, and uses said thread to schedule events.

An NSArray of events are maintained, and a scheduleAction:target:inTimeInterval: routine creates and adds events to this array, then pokes the thread.

The thread grabs the next event in sequence, then uses mach_wait_until to sleep until the time of the next event arrives, then performs the specified action on the target. It’s kinda a DIY NSRunLoop.

Here’s a comparison between this technique, and just using performSelector:withObject:afterDelay: (which schedules a timer on the NSRunLoop), observed while performing various scheduled events within Loopy running on my iPhone 4 with the debugger, and derived by comparing the time of event execution with the event’s scheduled time:

Mechanism Average discrepancy Minimum discrepancy Maximum discrepancy
NSRunLoop 16.9ms 0.25ms 153.7ms
TPPreciseTimer 5.5ms 0.033ms 72.0ms

That was attempt number 1: This seems to give us about 11.4ms better accuracy on average (three times more accurate).

Not bad, but it turns out mach_wait_until isn’t really that accurate, particularly if there’s a bunch of other stuff going on in other threads.

Spinning, for fun and profit

For my second attempt, the thread performs a mach_wait_until until just before the event is due, then performs a spin lock until the time arrives, using mach_absolute_time to compare the current time with the target time.

This gave further improved results — here’s that table again, but with the new scheme added, with a few different spin lock times:

Mechanism Average discrepancy Minimum discrepancy Maximum discrepancy
NSRunLoop 16.9ms 0.25ms 153.7ms
TPPreciseTimer (original) 5.5ms 0.033ms 72.0ms
TPPreciseTimer (10ms spinlock) 6.0ms 0.002ms 76.5ms
TPPreciseTimer (100ms spinlock) 3.7ms 0.002ms 44.8ms
TPPreciseTimer (200ms spinlock) 2.91ms 0.002ms 74.1ms

It appears that the more stuff there is going on in other threads, the more likely the mach_absolute_time call is to overshoot. So, the more time spent in the spin lock, the more leeway mach_absolute_time has to wait too long. Of course, that’s at the cost of making the CPU twiddle its thumbs for the duration.

Better than a punch in the knee

The results weren’t quite as fantastic as I’d hoped — still within the same order of magnitude, that’s for sure — but the average case for the 200ms spinlock approach is 14ms, or 5.8 times, more accurate than the traditional approach, and the minimum case is dramatically better.

You know, I think if I was aware of the results in advance, I might not bother, but I’ll stick with my hard-won 14ms now that I’m here (that’s 617 audio samples, I’ll have you know).

If anyone’s curious about the implementation (or wants to take a stab at doing better), here it is, along with a wildly simplistic commandline test app: TPPreciseTimer.zip

Now to get back to some real work.

Addendum: GCD follow-up

Chris in the comments below suggested trying a GCD-based approach, using dispatch_after. Curious, I rigged it up, and these are the stats, collected the same way as above, added to the prior table:

Mechanism Average discrepancy Minimum discrepancy Maximum discrepancy
NSRunLoop 16.9ms 0.25ms 153.7ms
TPPreciseTimer (original) 5.5ms 0.033ms 72.0ms
TPPreciseTimer (10ms spinlock) 6.0ms 0.002ms 76.5ms
TPPreciseTimer (100ms spinlock) 3.7ms 0.002ms 44.8ms
TPPreciseTimer (200ms spinlock) 2.91ms 0.002ms 74.1ms
dispatch_after (main queue) 14.8ms 0.16ms 161.2ms
dispatch_after (dedicated queue) 19.2ms 0.1ms 174.9ms
dispatch_after (dedicated queue + 100ms spinlock) 22.4ms 0.002ms 306.8ms

So, they appear pretty much the same as the NSRunLoop stats.

Read More

Sparrow users beware: Bug sends prior draft instead of latest email version

Update: The Sparrow guys tell me they’ve found and nailed the bug, and will release the fix in 1.4 in late September.

I’ve just discovered a critical issue with Sparrow that I thought others should be warned of. It just bit me, big-time, when in the middle of an important negotiation with a third party, an earlier unpolished draft was sent out instead of the final email, when I experienced a momentary Internet connection dropout.

Sparrow has an issue where hitting “Send”, in unreliable network conditions, on a draft message that has been modified, results in a prior copy of the message being sent, rather than the latest version.

To replicate this issue reliably:

  1. Create a new message (Cmd-N)
  2. Specify a recipient (oneself), subject, and some body content (say, the letter “A”)
  3. Hit “Save”, to save the draft
  4. Change “A” to “B”, then disconnect the network connection (in my case, turning off the radio on my external WiFi adapter), then hit “Send”. Sparrow will report a failed connection, and will keep the outgoing message with state “Pending”
  5. Restore network connection. Upon detecting the restored connection, Sparrow will proceed to send the message
  6. Check email. Received test email will have “A” in the email body.

Scary stuff. I hope they’ll fix this soon, but it’s going to make the app difficult to trust in future!

Update: I should mention, a probable workaround for this is to never, ever hit “Send” until you’ve saved the draft, and verified that the save operation has completed (perhaps even restart the app first).

Read More

Seamlessly manage portrait and landscape view controller layouts

A headache-inducing scenario: I’m working on a view controller, and I realise that in order to support landscape and portrait modes, I’m going to need to provide two different layouts.

So, I create two different views within the nib, one portrait, one landscape, each with the same view hierarchy, but with a different layout.

When the orientation changes, I set self.view to the appropriate view. I initialise both views on load, and keep both of them synced to properly reflect the app’s state — basically, I’m double-handling everything, which bloats my code and increases the chance I’ll make a mistake.

So, here’s an easier way: Rather than maintaining two separate view hierarchies and switching between them when the orientation changes, why not just change the layout of one single view hierarchy? The only changes between the portrait and landscape views are layout changes, so if we can extract just the layout information from each view, then we don’t have to worry about maintaining both view hierarchies.

Basically, we’re talking about using each view version as a layout template only.

That’s what TPMultiLayoutViewController class does. It’s a drop-in UIViewController subclass that automatically manages switching between different view layouts for portrait and landscape orientations, without the need to maintain view state across two different view hierarchies.

It works by defining portraitView and landscapeView outlets which it traverses upon loading the nib. It matches each subview element to its counterpart in the other layout (based on tag, target/action, title, etc.), and stores just the layout attributes of each element.

Then, when the orientation changes, the view hierarchy is traversed and these layouts are applied to each subview.

To use it,

  1. Set the superclass for your view controller to TPMultiLayoutViewController.
  2. In Interface Builder, create two different views: one for portrait orientation, and one for landscape orientation.
  3. Attach your portrait orientation root view to the “portraitView” outlet, and the landscape orientation root view to the “landscapeView” outlet.
  4. Attach one of the views (whichever you prefer) to the “view” outlet, and connect any actions and outlets from that view.

Grab it from the TPMultiLayoutViewController GitHub repository, and let me know what you think.

Read More

Fixing Xcode 4’s symbolicate utility to get comprehensible crash logs

‘symbolicatecrash’ is the Developer Tools utility which replaces all those meaningless addresses from crash logs with actual symbol names and source code references. It lives at some obscure folder within /Developer – use find to dig it up and symlink it into /usr/local/bin if you wanna use it conveniently from the command line.

Anyway, after plenty of frustration, I noticed some chatter about the damn thing being busted in Xcode 4. Figures!

There’s an alternate third party version on GitHub, but this didn’t really help me – I still got inscrutable errors, so I took a look at the original.

The version that comes with Xcode 4 appears to have some problems distinguishing, say, an iPhone Simulator build of the app from a native build sitting in the Archives folder. I’d just see an error about otool and some binary living in the iPhone Simulator folder.

Digging into the errant symbolicatecrash source, I noticed that the code that finds the executable path tests each candidate using otool, but doesn’t seem to be able to comprehend the output from otool caused by running it on the wrong architecture.

So, replacing the rather unhelpful ‘die’ statement on line 323:

die "Can't understand the output from otool ($TEST_uuid -&gt; '$otool -arch $arch -l $path')";

With a “No, it ain’t this executable” response:

return 0;

…solves the problem immediately. Now I can drag crash logs straight into the Organizer in Xcode, and it’ll symbolicate correctly.

Read More

Post Grabber sniffs out POST data, generates curl scripts

Post Grabber screenshot
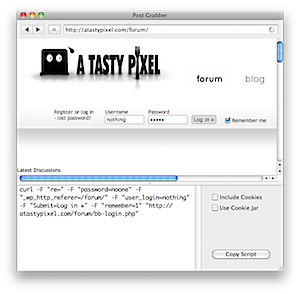
Every now and then I find myself needing to automate some web requests, either to download using something a little more robust than a web browser, scrape some web content, or to maintain a session. That automation can be a bit of a pain if there’s a form submission involved, because it means opening up the page source, finding the form and any connected javascript code, and figuring out what fields are submitted.

A little utility I just put together does that for you: Post Grabber detects POST data and generates an equivalent “curl” command that can be used in shell or Automator scripts.

Post Grabber works with its own internal browser, so it can intercept POST submissions directly. That means it works with HTTPS, unlike the traditional web sniffer approach.

Download the app, or see the source on GitHub.

Read More

Hi! I'm Michael Tyson, and I run A Tasty Pixel from our home in the hills of Melbourne, Australia. I occasionally write on a variety of technology and software development topics. I've also spent 3.5-years travelling around Europe in a motorhome.

I make Loopy, the live-looper for iOS, Audiobus, the app-to-app audio platform, and Samplebot, a sampler and sequencer app for iOS.

Follow me on Twitter.

Posts pagination

« 1 2 3 … 7 »
© 2021 A Tasty Pixel.