Convert text to iTunes audio book Convert text to iTunes audio book
  • Home
  • Posts
  • Home
  • Posts

Mac

Convert text to iTunes audio book

200805071617.jpgAfter reading a hint on macosxhints on how to create an audio file from text, because I wanted to keep reading my book while I was driving, and figured that holding the book in front of me probably wasn’t the best option, I figured the process could probably be streamlined a bit.

So, I’ve made a service which appears in the Services menu and operates on selected text. So, select it in Safari, or from an eBook in Preview (or Textedit if it’s just plain text), and click ‘Speak to iTunes Audio Book‘ to speak the text into a track in iTunes that will appear in ‘Audiobooks’.

Read More

Nasty long sleep times with SleepWatcher

If you followed my prior hint on automatically ejecting volumes on sleep (@ macosxhints), I’ve just discovered that SleepWatcher adds about 30 seconds to the time taken to sleep. This has been a big frustration to me over the last month or so, and now I know why.

I’m removing the utility – I’d rather shorter sleep times than automatic volume ejection. What a shame, though.

Incidentally, while we’re talking sleep, recent Macs also save the contents of RAM onto disk when they sleep. For the purposes of comparison, my 2 Ghz Macbook Pro with 2 Gb of RAM takes about 18 seconds to sleep. There are a variety of ways to alter sleep behaviour, but the easiest is the SmartSleep utility, a preference pane that handles it for you.

My favourite feature is its namesake, smart sleep, which will only do a hibernate if the battery is below a pre-set level (default 20%) – that means fast sleep until it’s a good idea to actually backup the session to more long term storage, when the battery is about to fail. Voila, simultaneous cake have-age and eat-age.

Read More

Automatically eject all disks on sleep, reconnect on wake

sleep-macbook.png

Using a laptop with permanent external drives can be a bit annoying when you leave the desk – you have to manually eject all your devices, otherwise you get that dreaded ‘Device Removal’ dialog. With a little bit of Terminal magic, you can automatically eject disks when you sleep the laptop, meaning you can just put the lid down and go. Disk are also reconnected automatically on wake, for when you’re just sleeping the computer without going places.

It’s all thanks to a little utility by Bernhard Baehr called SleepWatcher, which runs in the background and is triggered by sleep and wake events, calling scripts to perform required actions.

Download and install SleepWatcher and its StartupItem.
Next, you’re going to create ~/.sleep and ~/.wakeup files which SleepWatcher will call upon. Pull up your favourite text editor and paste the following in (should be just two lines):

#!/bin/sh
osascript -e 'tell application "Finder" to eject (disks where free space ≠ 0)'

Save the file – call it “sleep.txt”, and save it to the Desktop; make sure it’s plain text! Then put the following in another file, called “wakeup.txt”, saved to Desktop too (also just two lines):

#!/bin/sh
/usr/sbin/diskutil list | grep -e ' +[0-9]+: +[^ ]+ [^ ]+' | sed 's/.(disk[0-9].)/1/' | xargs -I{} /usr/sbin/diskutil mount {}

Next, open the Terminal (Applications, Utilities, Terminal), and type the following:

mv Desktop/sleep.txt .sleep
chmod a+x .sleep
mv Desktop/wakeup.txt .wakeup
chmod a+x .wakeup

Now, whenever you sleep your machine, the external drives will be ejected automatically; when the machine wakes again, all connected external drives will be reconnected.

Read More

My iTunes iPhone playlist setup

 Files 2007 06 Iphone 34
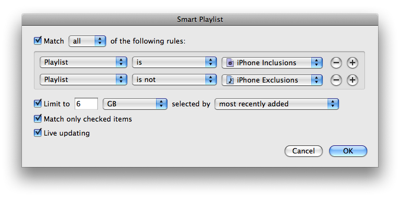
I used to manually choose the tracks to sync to my iPod Nano, but now I have 7-something gig to play with on the iPhone, it’s a bit too much. Instead, I use smart playlists to select which tracks to carry with me.

Two standard playlists, ‘iPhone Selections’ and ‘iPhone Exclusions’ allow me to specifically choose or disallow tracks to go onto the iPhone. Then, a smart playlist called ‘iPhone Inclusions’ looks like:


200712210847

Watch that ‘any’ selection in the top drop-down – a bug in iTunes resets it to ‘all’ every time you bring up the dialog, so you gotta reset it every time.

Finally, a smart playlist called ‘iPhone’, which is the one that is selected to be sync’d, looks like:

200712210848

That makes sure that tracks I manually choose are copied over, and the rest is automatically selected by rating and the date added (ideally).

Ratings, of course, are automatically set using AutoRate.

The one caveat is that because you can’t select more than one sorting criteria when limiting to a certain filesize in the smart playlist, you can just choose either to sort by add date – which means you’re guaranteed to get that great new album copied over – or by rating, so that you’re gunna get the best tracks. Not both, unfortunately, unless you limit the ‘iPhone Inclusions’ smart playlist too (but that means you won’t necessarily fill up the iPhone if you have lots of exclusions that would otherwise be included).

Other than that, it works quite well – I haven’t yet had a moment when I’ve missed anything on the iPhone.

Read More

Inquisitor still works on OS X 10.5 Leopard!

Inquisitor
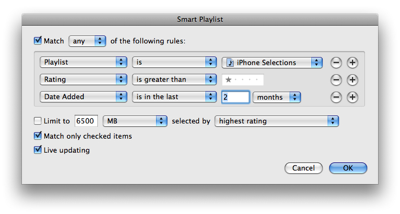
I read reports that Inquisitor was broken on Leopard because the InputManagers system has changed/been disabled. Not so!

Just create /Library/InputManagers and move ~/Library/InputManagers/Inquisitor into there, then chown -R root:admin /Library/InputManagers.

Restart Safari, and it’s back!

Read More

Connecting an iMac up to your TV

Update: Please note, this technique is the ‘lowest common denominator’ option, which will give the least quality image, but will probably work with any TV. If your TV supports it, the best options are VGA (the easiest option, and what I use with my 42″ Samsung TV and my Mac Mini), HDMI, or component.

I just drew this diagram to show my aunt and uncle how to hook up their iMac to their TV. Just in case it’s useful for anyone else:

<

p style=”text-align:center”>
200710191229


Everything can be bought at a standard electronics shop, except for the Mini DVI to Video adapter, which can be bought from an Apple shop, or from Apple’s online store.

Read More

Using Quicksilver with iTunes

200710151014I tend to play a fair bit of music while I’m working; sometimes I want to hear something in particular, and sometimes I’m happy to just let the shuffle do it’s thing (although some tracks I’ll skip).

Quicksilver makes all this really easy when used in combination with iTunes’ Party Shuffle. Firstly, I have the iTunes module installed in Quicksilver. Then, I’ve set up the hotkeys Ctrl-Shift-Left/Right for prev/next track, and Ctrl-Shift-Space for pause, first, for quick skipping of tracks, mostly. Also, I have Ctrl-Shift-Up for Search Artists, which lets me quickly select an artist/album/track to play.

I get iTunes playing the Party Shuffle playlist, which does nice things like plays more popular tracks more often (although you have to rate tracks to make that work – try AutoRate).

When I want to hear something specific, I press Ctrl-Shift-Up, type an artist, select an album, perhaps, and hit enter – my default action is ‘Play in Party Shuffle’, which puts the selected tracks at the start of the shuffle playlist and starts playing. So, that music starts playing immediately, then, once it’s finished, iTunes goes back to shuffling tracks, so the music keeps coming without further intervention.

If I wanna just cue tracks, I can select music, then tab to the next field and press ‘n’, which jumps to ‘Play Next in Party Shuffle’ – that cues up the selected tracks for play after the current track finishes.

I can select more than one track using Quicksilver’s ‘comma’ trick, selecting an item, then pressing comma to add it to the list. If I’m searching for a particular track by name, I bring up Quicksilver the normal way (Ctrl-Space), type ‘tr’ to ‘Browse tracks’, right arrow, then type the track name.

Thus, I never have to do any mucking around searching through music using the mouse, and I can concentrate on whatever I’m doing, not selecting music.

Read More

Optimising performance for OS X

Ttp4A seemingly unavoidable trait of all operating systems is the notorious slow-down – it doesn’t seem to matter how nicely you treat the system, after a few months it’ll start grinding to a halt (or is it just me?). This has happened to me in Windows, Linux and OS X, and it drives me absolutely crazy. The only way I knew to go back to a zippy system was to reinstall the whole system, which is pain, pain, pain.

An operating system divides the filesystem up into fixed-size blocks, which it reserves for storing files – as many blocks are needed to store each file. When you delete a file, it clears the associated blocks for later use. However, this inevitably leads to free blocks being located all over the drive, not in one contiguous segment, and that means that for the next file, blocks have to be selected that are located far apart on the drive. That means when that file is read, the hard disk has to seek all over to be able to gather all pieces of the file – slow.

A popular maintenance task for Windows users is defragmentation – this takes all the used blocks on the drive, and clusters them all together at the start of the disk, so that blocks containing data for the same file are located together, and the free space is all together. That means the system has less work to do to read files.

I’d read in several places (including Apple’s documentation) that defragmentation (otherwise known as ‘disk optimization’) isn’t really necessary on Mac OS X and probably won’t make much difference. Bollocks!

I just performed a defrag using the excellent Tech Tool Pro 4, which took around 24 hours (yikes); it made a huge difference to the snappiness of the system, though – comparable to when I entirely reinstalled the OS.

So, I highly recommend it – don’t listen to the nay-sayers, this makes a big difference. Just make sure you have the time to let the machine chug away for a day. Alternatively, just do a few hours at a time – you can stop it, and continue later.

Read More

Hi! I'm Michael Tyson, and I run A Tasty Pixel from our home in the hills of Melbourne, Australia. I occasionally write on a variety of technology and software development topics. I've also spent 3.5-years travelling around Europe in a motorhome.

I make Loopy, the live-looper for iOS, Audiobus, the app-to-app audio platform, and Samplebot, a sampler and sequencer app for iOS.

Follow me on Twitter.

Posts pagination

« 1 … 3 4 5 »
© 2021 A Tasty Pixel.