Using a VirtualBox VM to operate a network device for your Mac Using a VirtualBox VM to operate a network device for your Mac
  • Home
  • Posts
  • Home
  • Posts

Mac

Using a VirtualBox VM to operate a network device for your Mac

VirtualBox running TinyCoreLinux, operating the RTL8187 wifi adapterI recently wrote about our long-range USB WiFi antenna over on Technomadics, which is the nifty little device that we use to connect to the Internet while we’re travelling. It’s great, but — and it’s a kinda large but — the OS X driver (it’s an RTL8187) is just mind-blowingly appalling. It crashes very frequently, I can’t sleep my Mac at night without unplugging the device, and when I plug the device back in in the morning, nine times out of ten I need to reboot. Plus, I have to run the whole system in 32-bit mode because the driver is ancient. Realtek refuse to assist, so that’s that.

Three thousand reboots later, I decided enough was enough, and set about seeing if I could run a virtual machine with a small Linux installation which operated the card on behalf of my Mac, and shared the resulting Internet connection. It was a long learning curve, but I managed to get it all working quite satisfactorily, along with an Internet Sharing setup on my mac to share the connection onwards to other machines on the local network.

What’s more, the drivers I’m using under Linux — actually, they’re Windows XP drivers, running under the fantastic ndiswrapper utility — are brilliant, and I get much better signal strength, stability and throughput, to my great surprise.

If you’re in a similar situation, and either have a crappy driver to contend with, or no driver at all, or even just want a more solid firewall between you and the dangerous open WiFi world, here’re some instructions on how to get it set up, along with a virtual appliance I put together to make it all happen.

A warning in advance: This is Linux, so it aint for the faint of heart. If you’re not familiar with Linux, by all means give it a go, but be forewarned that if everything doesn’t work for you out-of-the-box, it is a steep learning curve.

Read More

Sparrow users beware: Bug sends prior draft instead of latest email version

Update: The Sparrow guys tell me they’ve found and nailed the bug, and will release the fix in 1.4 in late September.

I’ve just discovered a critical issue with Sparrow that I thought others should be warned of. It just bit me, big-time, when in the middle of an important negotiation with a third party, an earlier unpolished draft was sent out instead of the final email, when I experienced a momentary Internet connection dropout.

Sparrow has an issue where hitting “Send”, in unreliable network conditions, on a draft message that has been modified, results in a prior copy of the message being sent, rather than the latest version.

To replicate this issue reliably:

  1. Create a new message (Cmd-N)
  2. Specify a recipient (oneself), subject, and some body content (say, the letter “A”)
  3. Hit “Save”, to save the draft
  4. Change “A” to “B”, then disconnect the network connection (in my case, turning off the radio on my external WiFi adapter), then hit “Send”. Sparrow will report a failed connection, and will keep the outgoing message with state “Pending”
  5. Restore network connection. Upon detecting the restored connection, Sparrow will proceed to send the message
  6. Check email. Received test email will have “A” in the email body.

Scary stuff. I hope they’ll fix this soon, but it’s going to make the app difficult to trust in future!

Update: I should mention, a probable workaround for this is to never, ever hit “Send” until you’ve saved the draft, and verified that the save operation has completed (perhaps even restart the app first).

Read More

Quick tip: Manipulating the OS X clipboard

Here’s a shortcut that comes in handy sometimes. There are two command-line utilities, pbcopy and pbpaste that provide direct access to the OS X clipboard.

They’re quite useful for doing various quick things with clipboard contents, like, say, writing it to a file:

pbpaste > Desktop/output.txt

Or altering them:

pbpaste | sed s/bacon/bea-con/g | pbcopy

Fun!

Read More

Post Grabber sniffs out POST data, generates curl scripts

Post Grabber screenshot
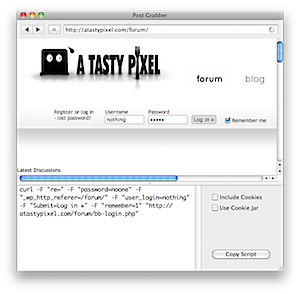
Every now and then I find myself needing to automate some web requests, either to download using something a little more robust than a web browser, scrape some web content, or to maintain a session. That automation can be a bit of a pain if there’s a form submission involved, because it means opening up the page source, finding the form and any connected javascript code, and figuring out what fields are submitted.

A little utility I just put together does that for you: Post Grabber detects POST data and generates an equivalent “curl” command that can be used in shell or Automator scripts.

Post Grabber works with its own internal browser, so it can intercept POST submissions directly. That means it works with HTTPS, unlike the traditional web sniffer approach.

Download the app, or see the source on GitHub.

Read More

Internet Timer keeps track of your timed Internet usage

Internet Timer iconI threw this utility app together last year, in order to keep track of our Internet usage on a time-limited account. This is a piece of software that lives quietly in your menubar, until an Internet connection is detected. Then, it will count how long you’ve been online, showing a timer in the menubar.

Features:

  • Detects your Internet connection automatically, or you can start and stop the timer manually.
  • Keep a log of your usage, including weekly, monthly, and all-time totals, and daily average, with the ability to reset these.
  • Time in configurable blocks of time, if your carrier charges in blocks (e.g., 15 minutes)
Read More

Easy Delayed Messaging using NSProxy and NSInvocation

Sometimes it’s necessary to perform an action some time in the future, whether it’s disabling a button for a certain time interval after it’s pressed, performing an animation after a short wait, or triggering a reload of some data.

NSTimer is great for that purpose, as well as repeatedly performing actions, but it’s most convenient utility method, scheduledTimerWithTimeInterval:target:selector:userInfo:repeats: only takes one ‘id‘ argument. Using the NSInvocation equivalent, scheduledTimerWithTimeInterval:invocation:repeats: requires creating and setting up the NSInvocation itself, which is always verbose and a pain.

NSProxy is a wonderful little construct that lets us interact with it like we were talking to the original object. I first learned how it works from a post by Shaun Wexler which shows an easier way to send a message on the main thread, by using the NSInvocation given via the NSProxy’s forwardInvocation: method. The same technique can be used to easily create a configured NSTimer.

So, instead of some awful thing like this:

NSInvocation *i = [NSInvocation invocationWithMethodSignature:[mapView methodSignatureForSelector:@selector(selectAnnotation:animated:)]];
[i setTarget:mapView];
MKAnnotation *annotation = view.annotation;
[i setArgument:&annotation atIndex:3];
BOOL flag=YES;
[i setArgument:&flag atIndex:4];
[NSTimer scheduledTimerWithTimeInterval:0.5 invocation:i repeats:NO];

NSInvocation *i = [NSInvocation invocationWithMethodSignature:[mapView methodSignatureForSelector:@selector(selectAnnotation:animated:)]]; [i setTarget:mapView]; MKAnnotation *annotation = view.annotation; [i setArgument:&annotation atIndex:3]; BOOL flag=YES; [i setArgument:&flag atIndex:4]; [NSTimer scheduledTimerWithTimeInterval:0.5 invocation:i repeats:NO];

We can do this:

[(MKMapView*)[TPTimerProxy scheduledTimerProxyWithTarget:mapView timeInterval:0.5 repeats:NO] selectAnnotation:view.annotation animated:YES];

[(MKMapView*)[TPTimerProxy scheduledTimerProxyWithTarget:mapView timeInterval:0.5 repeats:NO] selectAnnotation:view.annotation animated:YES];

Here’s the juice:

Read More

iPhone debugging tip: Breaking on exceptions and reading their content

Just a quick one: This may be obvious to many devs, but it’s worth noting. One common and useful debugging technique is breaking on exceptions, so that you can see exactly where in your app’s flow a breakpoint occurs.

This can be done by adding -[NSException raise] and objc_exception_throw to your breakpoints list.

Once an exception happens, you can then check out the exception itself to see what went wrong. The approach varies between platforms. If you’re in the simulator (or any Mac OS X app running on Intel), the exception will be stored in the $eax register. Take a look by typing:

po $eax

If you’re on the iPhone, it’ll be $r0, so:

po $r0

Read More

iPhone/Mac animation for custom classes: Property animation for more than just CALayer

I recently wrote a custom view — a 3D vintage-looking pull lever — that provided a continuous property to control the state. I wanted to animated this smoothly, a-la CABasicAnimation, but couldn’t find a built-in way to do so.

So, I wrote a class that provides similar functionality to CABasicAnimation, but works on any object. I thought I’d share it.

Features:

  • From/to value settings (currently only supports NSNumber and scalar numeric types, but easily extendable)
  • Duration, delay settings
  • Timing functions: Linear, ease out, ease in, and ease in/ease out
  • Animation chaining (specify another configured animation for chainedAnimation, and it’ll be fired once the first animation completes)
  • Delegate notification of animation completion
  • Uses a single timer for smooth lock-step animation
  • Uses CADisplayLink if available, to update in sync with screen updates

Use it like this:

- (void)startMyAnimation {
  TPPropertyAnimation *animation = [TPPropertyAnimation propertyAnimationWithKeyPath:@"state"];
  animation.toValue = [NSNumber numberWithFloat:1.0]; // fromValue is taken from current value if not specified
  animation.duration = 1.0;
  animation.timing = TPPropertyAnimationTimingEaseIn;
  [animation beginWithTarget:self];
}

- (void)startMyAnimation { TPPropertyAnimation *animation = [TPPropertyAnimation propertyAnimationWithKeyPath:@"state"]; animation.toValue = [NSNumber numberWithFloat:1.0]; // fromValue is taken from current value if not specified animation.duration = 1.0; animation.timing = TPPropertyAnimationTimingEaseIn; [animation beginWithTarget:self]; }

Make sure you also include the QuartzCore framework, used to access CADisplayLink, if it’s available.

It’s BSD-licensed.

Grab it here: TPPropertyAnimation.zip

Read More

Hi! I'm Michael Tyson, and I run A Tasty Pixel from our home in the hills of Melbourne, Australia. I occasionally write on a variety of technology and software development topics. I've also spent 3.5-years travelling around Europe in a motorhome.

I make Loopy, the live-looper for iOS, Audiobus, the app-to-app audio platform, and Samplebot, a sampler and sequencer app for iOS.

Follow me on Twitter.

Posts navigation

1 2 … 5 »
© 2021 A Tasty Pixel.